Introduction page - Página de inicio

We click “Continue” to open the Software.
Pulse Continuar para comenzar el programa.
Line Identification - Identificación de la línea
In the next screen, we fulfill the data required to identify the zone in which the curve we want to calculate is located.
En la siguiente pantalla, rellenaremos los datos que identifican la zona en la que está ubicada la curva que vamos a calcular.

Estos datos no son imprescindibles para el cálculo, pero sí serán muy convenientes para su archivo e impresión.
New Curve - Nueva Curva
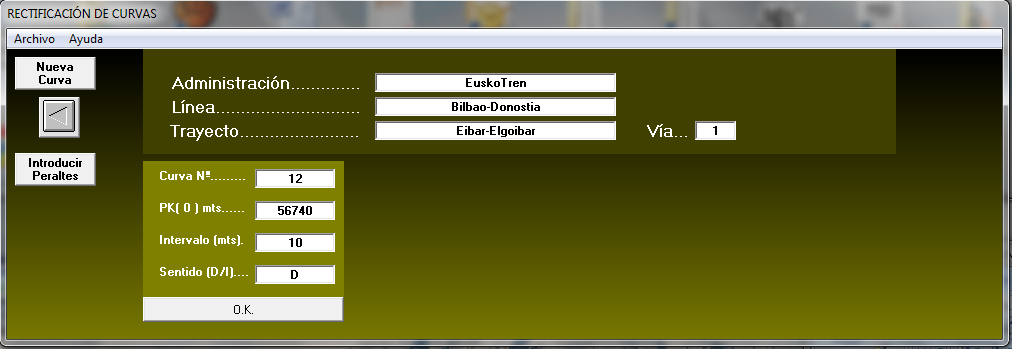
We fulfill the data of the new curve:
Se rellenan los datos de la nueva curva:
Se rellenan los datos de la nueva curva:
Curve Nb.: It can be a number, a letter or a combination of both.
PK (0) in meters: Here it is indicated the “kilometric point” previous to the first sagitta measured.
PK(0) en metros : Aquí deberá indicar el Punto kilométrico anterior a la primera flecha medida.
PK(0) en metros : Aquí deberá indicar el Punto kilométrico anterior a la primera flecha medida.
Interval (meters): It is indicated the measured interval. The software uses as default 10m but it can be modified.
Direction (Right (R)/ Left (L)): if we look at the curve in the direction of the kilometer measurement, the curve will turn right (R) or left (L). This data is essential in order to allow the software calculate the distance of the references considered
Sentido (D/I): Si miramos la curva en la dirección a la kilometración, la curva girará a derechas (D) o a izquierdas (I), este dato es fundamental para que el programa calcule posteriormente la distancia de las referencias tomadas.
Sentido (D/I): Si miramos la curva en la dirección a la kilometración, la curva girará a derechas (D) o a izquierdas (I), este dato es fundamental para que el programa calcule posteriormente la distancia de las referencias tomadas.
In case we want to restore the field-data of a calculated curve, we don´t click in “New curve”, but we go to File and click “Open Existing Curve”, which will look for a file of type "way*curve*.txt" with the corresponding data in the folder “CALCULATED CURVES”.
En el caso que quiera recuperar los datos de campo de una curva ya calculada, no pulse "Nueva Curva", puede ir a Archivo y pulsar "Abrir Curva Existente", para lo cual deberá existir un fichero (vía*curva*.txt) con sus datos en la carpeta “CURVAS CALCULADAS”

The software will ask for the Curve and railway number, which id the information used to save the curve. For instance: “railway_1_curve_12.txt”
El programa le pedirá el nº de la curva y la vía, datos con los que está grabada la curva, ejemplo: “vía_1_curva_12.txt”

Introduce Measured Sagittas-Introducir Flechas medidas
If we have loaded an existing curve, these data would have been already restored by the software, although they can be modified later.
Si ha cargado una curva existente, estos datos ya los habrá cargado el programa, aunque siempre los podrá modificar.

The fields Nb and PK (meters) are fulfilled automatically by the software, so we must only fulfill those corresponding to the SAGITTA (mm). The decimals must be separated by a comma.
Los campos de Nº y PK (mts) los rellena el programa, por lo que solo deberá rellenar el campo correspondiente a la FLECHA (mm). Los decimales los deberá separar con una coma.
Los campos de Nº y PK (mts) los rellena el programa, por lo que solo deberá rellenar el campo correspondiente a la FLECHA (mm). Los decimales los deberá separar con una coma.
Each time we introduce a sagitta value, we press [Enter] or the “OK” button. The software will automatically detect if there is any mistake in the information introduced, and in that case it will ask to modify it.
Cada vez que introduzca una flecha se pulsa [Enter] o el botón OK, el programa detectará si hay algún error en el dato introducido, y en su caso se lo mostrará.
By means of the vertical-displacement bar we can check the data introduced, and modify them if necessary.
Mediante la barra de desplazamiento vertical, podrá comprobar los datos introducidos, y en caso de modificarlos.
Each time we introduce a sagitta, it will be shown in the graph appearing at the bottom of the screen, which helps significantly detecting errors immediately.

Once we finish introducing sagittas, we press “End Sagittas” and the next Box will appear:
Cuando haya terminado de introducir las flechas, pulse la barra “Terminar Flechas” y aparecerá el siguiente cuadro.
Introduce references- Introducir referencias
If we have loaded an existing curve, these data will be already caught by the program, although we can still modify them if necessary.
Si ha cargado una curva existente, estos datos ya los habrá cargado el programa, aunque siempre los podrá modificar.
If we have loaded an existing curve, these data will be already caught by the program, although we can still modify them if necessary.
Si ha cargado una curva existente, estos datos ya los habrá cargado el programa, aunque siempre los podrá modificar.

Las “Referencias” son puntos fijos en los que podemos posicionar la vía actual mediante un punto kilométrico , una distancia transversal y el lado de la vía en que se encuentra.
Once we have finished introducing the references, we press “End References” and it appears the next box:
Cuando haya terminado de introducir las referencias, pulse la barra “Terminar Referencias” y aparecerá el siguiente cuadro.
Data of the Radiuses- Datos de los radios

Checking the curve we will see the curve configuration, identifying easily if it’s about a curve of one or several radiuses.
Analizando el gráfico veremos la configuración de la curva, y si se trata de una curva de uno o varios radios.
The diverse circular curves can be detected by the similar sagittas in each zone, or either by where the upward or downward trend is changed.
Los radios o zonas circulares los detectamos por la similitud de las flechas en una zona, o donde cambia la tendencia ascendente a descendente o viceversa.
With the graphical example we notice that it is a curve with 2 radiuses, and with entry, intermediate and exit transitions (zone in which the sagittas increase or decrease linearly).
En el ejemplo gráfico vemos que se trata de una curva con 2 radios con transiciones de entrada, intermedia y salida (zona en la que las flechas aumentan o disminuyen linealmente).

In the box above we must fulfill the 2 PKs that delimitate the circular zones of each radius.
En el cuadro superior debemos introducir los dos PKs entre los que están las zonas circulares de cada radio
Either if we have curves of various radiuses, single radius or triangular curve, we must introduce the PKs in which the circular curve(s) is (are) between.
Tanto si se trata de curvas de varios radios, curvas de un radio o curvas triangulares, introduciremos los PKs entre los que están las circulares o la circular.
As commented before, the software is capable to simulate curves with up to 6 radiuses.
El programa está preparado para calcular curvas de has 6 radios.
Once we have introduced the data, we press CALCULATE and the software will carry out the first “fitting” of the curve, which will be preliminary and far from the optimal.
Cuando haya introducido los datos, pulse CALCULAR y el programa realizará un primer ajuste de la curva, que probablemente no sea el mas idóneo.
Calculation-Cálculo

This first calculation will be our base for the straightening.
El programa ha realizado un primer cálculo que nos servirá de base para rectificar.
- The red line represents the primitive status-La línea roja representa el estado primitivo.
- The green line represents the status once straightened with the radius and transitions shown in the box above-La línea verde es el estado una vez rectificada con los radios y transiciones que se ven en el cuadro superior.
- The blue line represents the displacement-La línea azul representa el desplazamiento.

By means of the arrows placed below each datum of radius and transitions, we can modify them increasing or decreasing each parameter in order to adjust the displacements (blue line) to the values sought.
Mediante las flechas que están situadas bajo los datos de radios y transiciones, podemos modificar incrementando o disminuyendo los parámetros para ajustar el gráfico de desplazamientos (Azul) a lo nosotros deseemos.

Moreover, we have two additional bars of horizontal displacement (left side of the screen) in order to adjust easily the magnitude in which we want to increase or decrease the radius or transitions.
Disponemos también de 2 pequeñas barras de desplazamiento en el lateral izquierdo para ajustar la magnitud con la que queremos ir aumentando o disminuyendo los radios o las transiciones.

The cell shown at the top of the screens shows us the sum of the displacements, which, unless being special cases, we must try to bring to the minimum possible values.
Una casilla nos indica la suma de los desplazamientos, salvo en casos especiales deberemos ajustar la curva hasta que esta suma sea lo mínima posible.
It is essential that the obtained displacements are being balanced (positive and negative) throughout the whole curve, showing in the graph a kind of zig-zag line.
Es importante que los desplazamientos obtenidos se vayan compensado (positivos y negativos) a lo largo de la curva, en el gráfico deberá verse una línea en zig-zag a lo largo del desplazamiento cero.

In case the transitions are overlapped or exists any incorrect parameter that jeopardizes the accurate calculation, the program, will show an alarm text of [OVERLAPP]. This text will be “on” until the problem is cleared after modifying any of the parameters.
En el caso en el que se solapen las transiciones o exista algún parámetro incorrecto que impida el cálculo exacto, el programa le avisará mostrando un panel de texto y encendiendo una casilla roja de [SOLAPE], esta casilla permanecerá en el cuadro hasta que se haya solucionado el problema después de haber modificado algún parámetro.
In this screen it is shown as well an arrow (below “New Curve”) in order to return to the previous screens and modify the data of the radiuses.
En esta pantalla dispone también de una flecha (debajo de "Nueva Curva") para volver a la pantalla anterior y poder modificar los datos de los radios.
Triangular Curves-Curvas Triangulares
In case of having a curve with a single radius, we will see a box called “Triangular?”, which by default has an “N” of NO. In case of having a triangular curve we must put an “S” (of SI/YES) there
En el caso de que se trate de una curva de un solo radio veremos una casilla denominada ¿Triangular?, que tiene colocada como predeterminada una (N) pero que el caso de que la curva que estamos calculando sea triangular, deberemos colocar una (S).

The program tells us automatically that the second transition will be calculated by the very software, since it will be equal ((2*development)-LTE). We can only change the LT1 and the radius, but not the LT2.
En este caso, el programa nos avisa de que la segunda transición la calcula el programa, ya que será igual a ((2*desarrollo)-LTE ). Solo podremos intervenir en la LT1 y en el Radio
The calculation will be carried out the same way as in other curves.
El cálculo se lleva a cabo de la misma manera que en las otras curvas
Introduce cambers - Introducir peraltes.
Once we have concluded the calculation, we press the lateral button “Introduce Cambers” and it will appear a box where we must introduce the camber corresponding to each calculated radius.
Una vez dado por concluido el cálculo, pulsaremos el botón lateral “Introducir Peraltes” y nos aparecerá un cuadro donde introduciremos el peralte correspondiente a cada radio calculado.
The camber value introduced must comply with the regulations and codes of the applicable Railway Administration.
El peralte introducido deberá cumplir la normativa de la administración ferroviaria.

Once concluded this operation, if we press [Enter] or the [OK] button we will see the messages with the camber-slope of each one of the transitions.
Concluida esta operación, al pulsar [Enter] o el botón [OK] nos aparecerán unos avisos con la rampa de peralte de cada una de las transiciones.
Again, we must check that the values provided are consistent with the regulations and codes of the applicable Railway Administration.
Comprobaremos que estos datos cumplen con la normativa de la administración ferroviaria.

RESULT- RESULTADOS.
Displaying the “File” menu, we can save the data of the curve and the results pressing “Save results”.
Desplegando el menú "Archivo", puede grabar los datos de la curva y los resultados del cálculo pulsando ·"Grabar Resultados".

The software will warn automatically that a *.txt file is going to be created in the folder “CALCULATED CURVES”.
El programa le avisará que se va a generar un archivo .TXT en la carpeta "CURVAS CALCULADAS".

As has been explained in the chapter “Open Existing curve”, this file will be required in case you want to recover the data of the curve in order to recalculate it.
Como se ha explicado en el apartado"Abrir Curva Existente", este fichero le será necesario si en algún momento se quieren recuperar los datos de la curva para volverla a calcular.
PRINT RESULTS-
Displaying the menu “File” we can print the data of the curve and the result pressing “Print”.
Desplegando el menú "Archivo", puede imprimir los datos de la curva y los resultados del cálculo pulsando Imprimir.
Identification of the curve -Identificación de la curva:

Parameters.- Data of the calculated curve with relevant PKs, radiuses, transitions, cambers and camber-slopes in each transition.
Parámetros .- Datos de la curva calculada con puntos kilométricos de los puntos notables, radios, transiciones, peraltes y rampas de peralte en cada transición.

Results of the Calculation.- With measured sagittas, calculated sagittas, displacements and camber of each point.
Resultados del cálculo.- Con flechas medidas, flechas calculadas, desplazamiento y peralte en cada punto.


At the end of the sheet, we have the result of the sum of displacements.
Al final de la hoja, nos da el dato de la cuantía de la suma de desplazamientos.
References.- In this chapter there are indicated the data of the references taken, PKs, measured distances, calculated distances, camber in that point, reference type and side of the railway where it is located.
Referencias.- En este apartado se indican los datos de las referencias tomadas, P.K., Distancia medida, Distancia calculada, Peralte de la vía en ese punto, Tipo de referencia y Lado a la que está situada

Graph.- It is the graph where we can see the measured sagittas, calculated sagittas, displacements and cambers.
Gráfico.- Un gráfico en el que podemos observar las flechas medidas, las flechas calculadas, los peraltes y los desplazamientos.
Gráfico.- Un gráfico en el que podemos observar las flechas medidas, las flechas calculadas, los peraltes y los desplazamientos.

Providing this data to the tamper-crew, it will be achieves a significant improvement in the executed work, since are data mathematically accurate, as well as improvements in the performance of the machinery since we reduce the displacement to the minimum possible and they are balanced throughout the curve.
Entregando estos datos a los equipos de bateo, se apreciará una mejora importante en la calidad del trabajo ejecutado, por ser datos matemáticamente exactos, y en el rendimiento de las máquinas al reducir los desplazamientos al mínimo y estando estos compensados a lo largo de la curva.
Entregando estos datos a los equipos de bateo, se apreciará una mejora importante en la calidad del trabajo ejecutado, por ser datos matemáticamente exactos, y en el rendimiento de las máquinas al reducir los desplazamientos al mínimo y estando estos compensados a lo largo de la curva.


Hola Alejandro, mi nombre es Nicolas Villarreal, y trabajo en una oficina técnica que se encarga de realizar los planos ferroviarios en Argentina.
ResponderEliminarEstamos interesados en mejorar el proceso de realización de dichos planos, buscando por Internet encontramos su blog y pudimos informarnos mejor sobre el método de las flechas para rectificar curvas.
Ademas vimos que realizo un software para dicha tarea, el cual estamos interesados en utilizar, motivo por el cual nos ponemos en contacto con usted para consultarle como adquirirlo.
Muchas Gracias.
Hola Alejandro, en el ejemplo que explicas de la curva compuesta por dos radios, si aplicas los desplazamientos indicados, la flecha obtenida es diferente a la flecha calculada. Supongo, segun la explicacion, que una vez obtenidas las flechas medidas, el programa genera una curva optima (flechas calculadas), por lo tanto el desplazamiento deberia ser la flecha calculada menos la flecha medida, a no ser que la curva que queramos conseguir sea otra.
ResponderEliminarSaludos.
Hola alejandro necesitaria comprar el programa, me podrías facilitar los medios para poder hacerlo?
ResponderEliminar